To navigate between the windows you will find a button panel in the top right side of all windows.
It is recommended to notice the messages appearing in the status line while using the program. The background color changes like this:
- Green = Go ahead - ready for user input
- Yellow = Wait - computer is processing / a warning
- Red = Stop - an error has occurred
Notice: Features, which cannot be performed at a given time, will be disabled. E.g. the MIDI Player cannot be accessed if no MIDI file has been opened; a style file cannot be saved before a conversion is performed etc.
The initial conversion can be performed in the opening Main Window.
Most often some fine-tuning is required. This is done in the following windows.
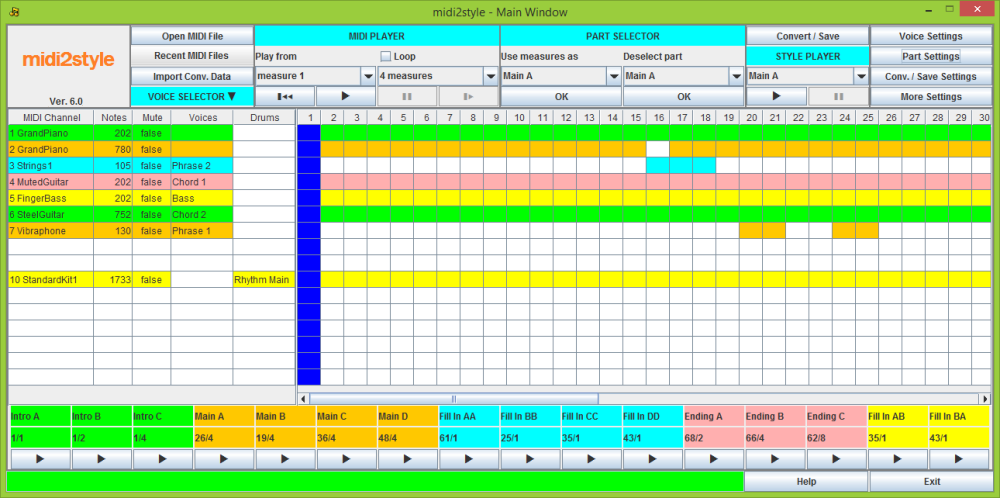
Here you open a MIDI file from the 'Open MIDI File' button or the 'Recent MIDI Files' list.
When calling the Open File Dialog window the program will open in the last opened folder.
The program reads MIDI format 0 and format 1. If the MIDI File is format 1 the file will be converted.
Until a new MIDI file is opened, the opened MIDI File remains in memory for further conversion.
If you have a 'Conversion Data' file from a previous project then import it.
The Conversion Data File has a 'm2s' file extension and is unique for the MIDI File.
If the imported Conversion Data File does not match the opened MIDI File an error message is shown.
In 'MIDI Player' play the MIDI file to find which measures and which voices you can use.
In the left part of the Piano Roll you can mute channels individually; and in 'MIDI Player' you can loop a section of the file to find loopable measures.
If channels are muted this works both when playing the entire file and while looping.
Mute selections cannot be made while the MIDI file plays or loops.
If the Loop checkbox is checked the player will loop the selected measures.
If the Loop settings conflicts with MIDI File length or Style part lengths the loop length will be reduced accordingly.
Loop selections cannot be made while the MIDI file plays or loops.
The maximum number of voices in style files is 8. Only these 8 voices are available for use in the style parts.
Assign these voices to the appropriate style channels in the 'Voice Selector'.
Don't use melody line channels for styles! You are supposed to play the melody yourself!
Select chord like MIDI channels for style Chords 1 and 2 channels. These are often guitars and piano channels.
Select a pad like MIDI channel for style Pad channel. This is often string channels.
Select phrase like MIDI channels for style Phrase 1 and 2 channels. This is often trumpets, vibraphones, etc. channels.
Rhythm channels only allow drum set assignments; other style channels only allow non-drum assignments.
Select the voices in the MIDI file for you style voices. Notice that you must do an initial selection of voices in this window.
When selecting a MIDI Channel the voice name and settings are transferred to the 'Voice Settings' window.
In that window you can change the voice to any other voice.
If a MIDI channel holds two or more unique instruments assignments an asterisk (*) is shown followed by the last instrument name.
Pressing the Play button (►) will start playing / looping the MIDI File from the selected measure.
Playback can be stopped by pressing the Stop button (▎ ▎).
Playback can be continued from the stop measure by pressing the Continue button (▎►).
Pressing the 'Back to Start Button' (▎◀◀) will set the Play/Loop to start at measure 1.
Selecting blocks of measures and quantize level is done in the 'Part Selector'.
The Loop settings - start measure and number of measures - can be applied to any part of the style by selecting the desired style part and pressing the OK button.
Due to style file format requirements the style file must have a Main A Part.
Deselect the measure blocks if convenient.
The measure settings are transferred to the bottom of the Piano Roll; and to the 'Parts Settings' window.
Click the 'Convert / Save' button to convert and save the Style file.
You need not save now. You will be warned if you try to run a new project or close the program without having saved.
When saving the sequence is:
- If 'Ask for OTS Data' is checked in 'Save Settings', an Open File Dialog will open, and you can select a style file (or an OTS File) to import OTS Data from. If you click 'Cancel' in this dialog, no OTS Data will be added.
- If 'Ask for Icon' is checked in 'Save Settings', a 'Select Icon' window will open. Click at the icon you prefer; or deselect icon. You may also cancel asking for icons at all. Asking for icon can then be re-activated in menu 'Save Settings'.
- The Save File Dialog window will open in the last opened folder. The program automatically suggests the Style File name as the MIDI file name. The Style File name can be changed to any valid name in this dialog. The Style File can be saved in any folder at any disc.
- If 'Export Conversion Data' is checked in 'Save Settings', a Save File Dialog will open; and let you save the conversion data to a file.
Check the style parts in 'Style Player' by pressing button Play (►). This will NOT sound as the keyboard; but it will tell you, if there are critical errors in your selections.
Style Parts will loop the selected style part.
Playback is stopped by pressing button Stop (▎ ▎).
Fine-tune the style in the following windows.
Access buttons to these windows are in the 'Navigation Panel' in the right side of this window. The buttons will be accessible once a file has been loaded.
In the Piano Roll you can watch which channels are active in the MIDI file.
At the bottom you will find the start measure and part length for all selected style parts; and Play buttons (►) for auditing the selected style parts.
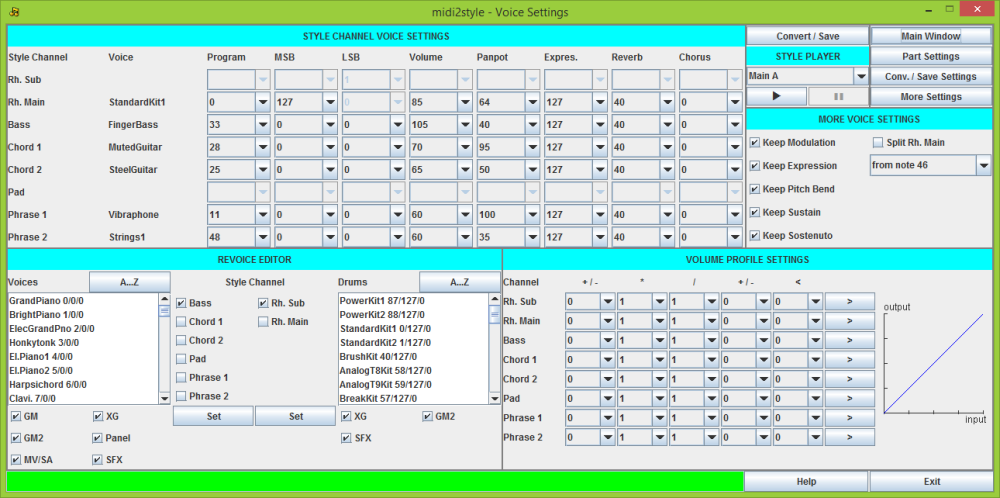
In this window you can set all the voice related settings.
In 'Style Channel Voice Settings' you can change your initial voice selection by changing the 'Program'; 'MSB' and 'LSB' values.
When changing Program number, MSB or LSB settings the resulting voice is shown in the Voice column.
Furthermore you can set the common voice parameters: Volume; Panpot; Expres. (Expression); Reverb and Chorus.
If the MIDI file lacks these settings default values will be used. All these settings can be changed.
If a Style Channel voice is changed (another instrument is to be used in the channel) the new voice will play the original pattern of the MIDI file.
If a selected voice is not supported at the keyboard model defined in the 'Program Setup', a message will be shown in the Status Line. This message will tell whether a default voice will be used or not.
In 'More Voice Settings' you can decide to keep or decline some more voice features.
Modulation, Expression, Pitch Bend, Sustain and Sostenuto effects in the MIDI file can be included in the Style file.
If these effects are set to 'keep' and if an event of these effects is found in the style part, the program will during conversion automatically insert events to reset these effects to their default value at the first tick in ALL style parts.
This is done to prevent these effects to 'hang' with a non-default value when looping and when switching to another style part. Default is keeping these effects.
These effects are ALWAYS kept in melodic intros and endings.
MIDI file channel 10 which holds the drum and percussion voices can be split into channel 9 (Rhythm Sub) and channel 10 (Rhythm Main) in the style file at the selected note number.
If this is checked; no MIDI channel can be selected or added to 'Rhythm Sub' in the 'Main window'.
In the bottom left part you will find the 'Revoice Editor' which makes voice selection somewhat easier.
To get the right voice list make sure you have selected your keyboard model in 'More Settings' window -> 'Program Setup'.
The available voices and drum sets for the selected keyboard model are shown in the two lists.
The lists can be sorted alphabetically or in type order by clicking the Button above the lists.
The lists can be filtered by unchecking one or more of the voice type check boxes below the lists.
Voices and drum sets can be assigned to a style channel by selecting the voice/drum set and the style channel and then pressing a Set-button.
Notice that you have to assign a source channel to a style channel in the 'Main Window' before you can revoice in this window.
In the bottom right part you will find the 'Volume Profile Settings', which makes it possible e.g. to lower high volume notes; to raise low volume notes; to limit volume etc.
The volume profile can be set in channels individually.
When values in the columns are set click button ► to update the Volume Profile Curve.
- Column #1: Adds/subtracts a number to the input value
- Column #2: Multiplies this value with a number
- Column #3: Divides this value with a number
- Column #4: Adds/subtracts a number to this value
- Column #5: Values below the selected number is set to zero
The resulting volume profile curve is drawn in blue color.
The controller in column #5 is not active in fade out measures of ending parts. In these measures volume will start to follow the white curve and then follow the blue curve.
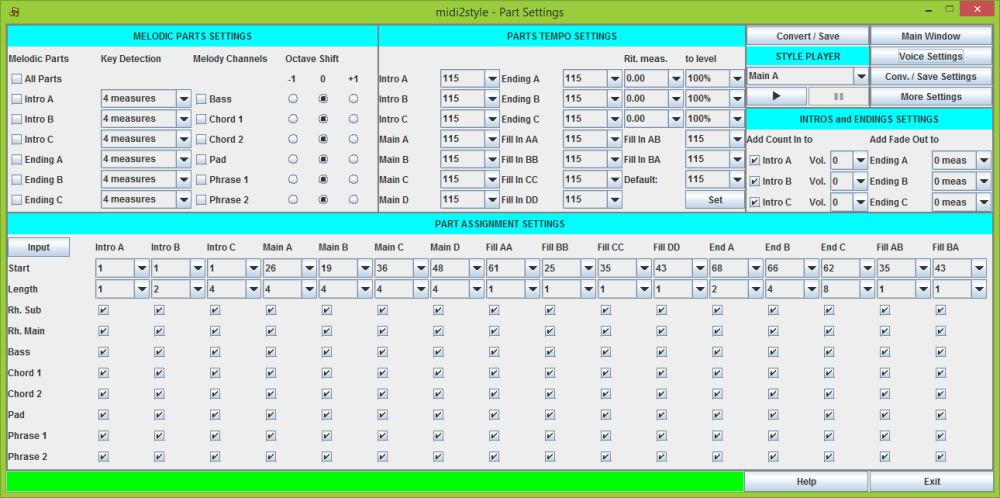
In this window you can set all the part related settings.
In 'Melodic Parts Settings' you can select 'Melodic Parts', i.e. parts playing not-harmonized; and set which channel to play the melody line.
Intro and Ending parts can be played 'melodic' with the chord progression of the original MIDI File - or 'harmonized' (as all Main and Fill parts) where the keyboard player plays the chord progression in the left hand.
In a style both melodic and harmonized intros and endings may occur. (Main and Fill parts will always be harmonized).
The melodic intro and/or endings parts can include the channel(s) of the original MIDI file which holds the solo / melody line instrument(s).
Normally this/these instrument(s) must not play in harmonized style parts (Main's and Fill's) as the keyboard player plays the solo / melody line in the right hand in these style parts.
If the solo / melody line instrument has to be included in melodic intros and/or endings of the style one or more channels has to be selected to play the solo / melody line instrument(s) of the MIDI File in these style parts. Often the Phrase channels are used for this purpose.
Melody channels can be moved one octave up or down.
Selecting one or more melody channels will automatically mute these channels in all harmonized (= not melodic) parts including all Main and Fill parts (note the deselections below) and deselect 'Delete Notes' in the 'Conversion / Save Settings' window for the chosen melody channels.
If two or more style parts are selected as melodic parts AND two or more style channels are selected for melody channels all combinations of these are selected in the lower parts of this window. Individually muting of part / channel combinations must be done manually below.
If a style part start measure or a style part length is changed (in the lower part of this window) after selecting Melody channels checking and unchecking of channels in style parts must be done manually below.
The choice in 'Key Detection' determines the number of measures to get the key of the intro / ending part for a correct joining of these parts to the harmonized parts (Main's and Fill In's).
For Intros the last measures are used for key detection; and for Endings the first measures are used. The default number of measures (4) will normally give good results.
If the MIDI file modulates within the measures selected for key detection, the process most probably will give a bad result. In this situation choose fewer measures for key detection.
In 'Parts Tempo Settings' you can set an individual tempo for all parts.
If one or more style part tempos differs from the others the program will during conversion automatically insert style part tempo events as the first event in ALL style parts.
This is done to prevent local tempo settings to be in effect when switching to another style part.
Ritardando (decreasing tempo) can be added to Ending parts.
The 'Rit.meas' box sets the number of measures for ritardando and the 'to level' box sets the end tempo in percent of the tempo in the corresponding Ending part.
Default values can be restored by pressing 'Set' button.
In 'Intros and Endings Settings' you can add 'Count In' to intros and 'Fade Out' to endings.
Count In can be added individually to the three Intro parts. The Count In beats will be added to the first measure of the Intro part no matter which notes are present there.
Count In volume is adjustable from 0 to 127. Default is no Count In.
Fade Out can be added individually to the three Ending parts. Fade Out will be active in the last measures of the ending as selected. Default is no Fade Out.
In 'Part Assignment Settings' you can change the initial part selection.
In the first row the style parts are labeled (Main A, Main B etc.).
In the second row (label: Start) the start measure of the style parts are set.
In the third row (label: Length) the style parts length are set.
Start and Length settings are transferred directly from the 'Part Selector' or can be selected manually in this window.
Alternatively clicking the Input button will open a window for setting part start measure and part length.
If invalid selections are made an error message will be shown in the status line at the bottom of this window.
After setting start measure and length of style part all channels are selected to sound in the style part. This default setting is shown by checking the check boxes in rows 4 to 11.
Unchecking a checkbox in rows 4 to 11 will mute the selected channel in the selected style part in the style file.
Note that often the 'Main A' part have fewer active voices than the 'Main D' part.
In this window you can set all the conversion and save related settings. Furthermore you can edit your converted style file.
In 'Conversion Settings' you will find the conversion parameters. The settings here have the most influence on the conversion result.
If not satisfied with the conversion result, it is recommended to change the settings in the 'Delete notes' and the 'Delete in chord recognition' columns.
Short notes can be deleted by selecting a value here. Selecting e.g. <= 1/64 will remove all note which have a length shorter than or equal to a 1/64 note.
'Delete Notes' will delete non-scale notes in Bass and Phrase channels and non-chord notes in Chord and Pad channels during conversion.
Deleting notes is recommended as this effectively removes disharmonies in the style file. Default is delete notes.
'Delete in chord recognition' will exclude channels in the program chord recognition. This is recommended for channels with more 'melody line' than 'chord' content.
'Chord recognition length' defines the part of measures used for chord recognition. Default is 1 measure.
The 'Transpose' setting determines the transpose method during the conversion.
When selecting 'only up' or 'closest + 1 octave' the voices will be higher, in average ½ and 1 octave respectively. (The ½ octave higher is accomplished by using another inversion of chords etc.).
When selecting 'only down' or 'closest - 1 octave' the voices will be lower. Default is 'closest'.
Transpose settings in this window ONLY applies to harmonized style parts. Transpose settings for melodic style parts must be made in 'Melodic Parts'.
Notes in channel Rhythm Sub and Rhythm Main can be shortened to a predefined value.
The best quantize level can be examined by selecting and testing six levels of quantizing.
Quantize is only active just before measure endings (and new measure beginnings).
The default value is recommended to make sure that notes activated e.g. 1/100 second before a new measure starts are moved to this new measure. Default is 1/128.
Select B notes to be added automatically to avoid disharmonies. This is a style format 'best practice'.
Style conversion is performed by clicking the 'Convert / Save' button.
The MIDI-file will be converted according to the set parameters.
After conversion the style file is in computer memory. The Style file need not be saved yet, but can be played back in the 'Style Player' and/or edited in the 'Style Editor'.
In 'Save Settings' you can add information to the style file; select style file format; and add various features while saving.
A Style Name can be added to the Style file. Default is the MIDI file name.
A Copyright notice can be added to the Style file. The last used Copyright notice is saved.
Two text messages can be included in the Style File. Default is no text messages.
Select SFF1 or SFF2 to save in these formats. Newer models will read 'both' formats; while older models will read SFF1 only.
If the selected model in 'Program Setup' does not support SFF2; this option is not available.
A default CASM section can be added to the style file. The format is defined by the Style File Format setting above. Default is add CASM.
This will set the Bass On feature, when playing fingered chords in AI mode. Default is do not set Bass On.
If the selected model in 'Program Setup' does not support Bass On; this option is not available.
Further editing of CASM must be done in the keyboard or in a program, e. g. my CASM Editor.
Integrate OTS data from another style file or an OTS file if the selected model supports OTS data.
Add an Icon to the style if the selected model supports icons in filenames.
If checked you will be asked for these features during the style file save process.
If checked the Export Conversion Data file dialog will open automatically after every Style save operation.
In 'More Conversion and Save Settings' you can write chords in the MIDI file to a log file (more in the 'More Settings' window).
And you can 'Export Conversion Data' if not done through the save process. The Conversion Data File has a 'm2s' file extension and is unique for the MIDI File.
In 'Style Editor' you can fine-tune your style by editing, adding and deleting notes and events. Furthermore you can play the style parts and channels individually.
Note on, note off and some effect events in style parts can be edited individually in the Style Editor.
The left part of the Window will change dynamically according to the selections made.
Read the messages in the Status Line in this window for online instructions.
Note that adding, deleting or editing effect events and tempo settings may result in unpredicted program behaviour.
The current setting of effects and tempo will be in effect until a new event of the same type is reached.
It is recommended to add events with default values in the beginning of all style parts to avoid that an event in a style part influences at all other style parts.
All event adding, deleting and editing in the Style Editor are logged to file. More in 'More Settings' window.

In this window you will find more information.
In 'MIDI File Properties' you will find data for the MIDI File.
In 'Style File Polyphony' you will find the maximum polyphony in the style parts.
In 'Program Setup' you can select MIDI device, keyboard model, language and Program Window Width.
The list shows the available MIDI devices in your system. Select a MIDI device for playback. If none selected the default device will be used (see below).
Selection of MIDI device can be changed while program is active.
MIDI devices can be added (e.g. USB) while program is active. Click 'Update' button!
The selected MIDI device will be memorized from a session to the next session.
If a previous selected MIDI device has been removed between sessions, the default MIDI Device will be used.
Program checks automatically for MIDI Device capability (MIDI In, MIDI Out or both ways).
In Java 'Real Time Sequencer' is the default MIDI device. In Java there is also a 'Gervill' MIDI device.
Select the Keyboard Model to avoid invalid voice selections for style file channels.
This setting must be done before channel assignments in the 'Voice Settings' window. Otherwise these must be done once again.
Select the User Interface language. Exit the program and restart to implement the new language setting.
Select the Program Window Width. Exit the program and restart to implement the new width setting.
In the last right column you will find access buttons for online resources etc.
In 'MIDI Chord Log' you will find a list of chords in measures in the MIDI file.
The chords in the opened MIDI Files are logged to the file 'filename_chords.txt', where 'filename' is the MIDI source file name.
In 'Style Editor Log' a list of edits in the 'Style Editor' (if any).
All note adding, deleting and editing in the Style Editor are logged to the file 'filename.txt', where 'filename' is the MIDI source file name.
In 'Program Event Log' you will find data about 'normal' program events.
Program opening, MIDI file opening, Conversion Data import/export, style conversion, Style file saving and program closing events are logged in the file 'Midi2StyleEvents.log'.
In 'Program Exception Log' you will find data about 'erratic' program events.
Program exceptions are logged in the file 'Midi2StyleExceptions.log'.
Log files are saved in a user folder, normally C:\Users\<user>\AppData\Roaming\jososoft
Delete Log: The log file will be deleted.
Save Log: The log file can be saved in a different place and/or name.
Update Log: The log file will be updated.
The log files can be read and edited in a text editor e.g. NotePad.
The log files can be moved, renamed or deleted. The program will automatically create new log files with the names above.
