 The Unofficial YAMAHA Keyboard Resource Site
Translate ►
Import and Use Ins Files
At Ins Files you will find many instrument definitions for the Yamaha Genos, Tyros and PSR series of keyboards.
Each instrument definition is stored in a file you can edit with any text editor. These files have the .ins name extension, such as PSR340.ins.
The name is not case-sensitive, so don't worry about mixing upper and lower case in the filename.
When you import an instrument definition, it is added to the master instrument definition file master.ins.
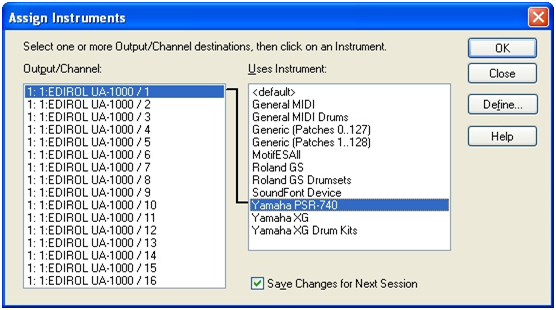
The contents of master.ins determines the list of instruments that appear in the Assign Instruments dialog box.
1. In Cakewalk or Sonar, choose the Options-Instruments menu to display the Assign Instruments dialog box.
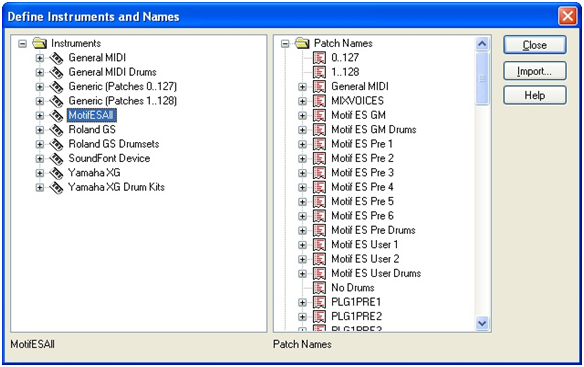
2. Click Define to display the Define Instruments and Names dialog box.
3. Click Import to display the Import Instrument Definitions dialog box.
4. Navigate to the file that contains the PSR instrument definition you downloaded from this web site, "PSR540.ins" for example. Click Open. In the new panel, Cakewalk displays a list of all the instrument definitions in the file. Usually for a PSR instrument there is just one.
5. Chose one or more instruments from the list and click OK.
6. Click the Close button to close the Define Instruments and Names dialog box.


Now that you have installed and imported your PSR instrument definition, it is time to put it to use in your Cakewalk project.
Using your instrument definition with Cakewalk is easy and powerful. Start out by opening the Track View of your song.
You can make patch changes for any track in the view either before or during song play. Let's try it with the song playing.
1. Right click on any column (except Bank and Patch) in the track you wish to change.
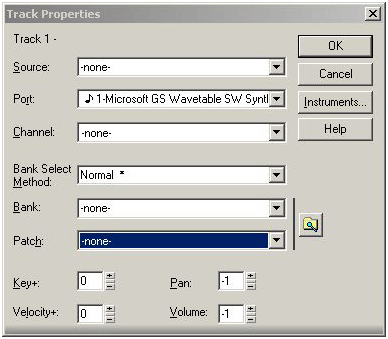
2. In the popup menu that opens, choose Track Properties to open the Track Properties dialog box.
3. Find the Patch setting. This setting indicates which patch, or instrument, is used by this track.
4. To change the patch, select a new patch from the drop-down list. Or, better yet, click the yellow icon button to the right of the Patch window. The Patch Browser dialog box pops up. In the window titled "Show Patches Containing the Text" type in a word or phrase. For example, if you wish to see a list of all piano instruments for your PSR, start typing in "pian". That's as far as you need to go. You'll see the list reduced to just the piano voices. Highlight one by clicking on it. Listen to the change in voice. You can experiment with different instrument voices until you find the one you want.
5. Now click OK. The Patch Browser dialog disappears. Your selection appears in the Patch pane of the Track Properties dialog box.
6. Click OK to save your new instrument for the track patch.

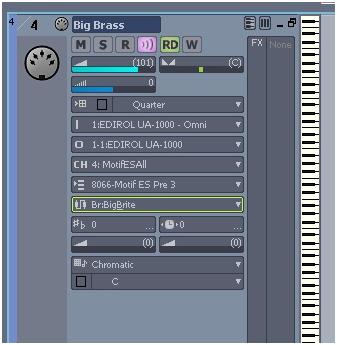
Using your instrument definition with Sonar is much more powerful than before. With the improved user interface, the expanded track properties pane shows the same choices for which previous versions required a dialog box. Now the properties are embedded in the Track View window itself.
Thus, from the Track View, you can make patch changes directly either before or during song play.
1. Expand the track properties to expose the "Patch" button and click its opener icon. In Sonar 6 this is the triangle on the right end of the button.
2. When you click the opener, Sonar pops up the list of patch names available in the Patch Bank selected.
In the example, the patch bank is 8066-Motif ES Pre 3 and for the Yamaha Motif that bank will fill the popup with four columns of patch names, or, in Motif parlance, "voices." In our example above, I have chosen Big Brite from the brass category.

Tip of the Day
Music Programming
For the technical minded there are a lot of ways to create music and music software.
Interesting topics are: Music format conversion; automatic music generation; and cataloguing/database programs.
Links to projects and tools are found in the Programming page.
Software of the Day
Lyrics Finder
Lyrics Finder detect and extract lyrics from MIDI, Karaoke and XF files. Extracted lyrics can be edited, formatted, printed and saved.
Additionally all textual data (e.g. Copyright) can be extracted; and lyrics can be converted in several ways.
More at the Lyrics Finder Home Page.
© 1999-2025 Jørgen Sørensen
This site does not use cookies; but Google may use non-personal information to provide relevant ads.
I hereby expressly disclaim any liability for the content in and the legality of externally linked sites and pages.
All information is presented 'as-is' meaning: No warranties whatsoever for correctness; completeness or usefulness.
All my downloads are free of adware, spyware, virus, toolbars, etc. Check at McAfee SiteAdvisor or at VirusTotal.
If you find the information at this page useful, you can mail me a 'Thank You' or send me a donation.
